
Acrylic nail removal can be a simple process that many individuals can do in the comfort of their own homes as long as its done correctly.
Acrylic nails are an option, for those who want lasting and attractive nail enhancements but there comes a time when they need to be taken off. Typically this involves soaking the nails in acetone to loosen the acrylic material making it easier to scrape or push them off without harming the nail bed. Thanks to kits and online tutorials many people have successfully managed to remove their acrylic nails on their own. This DIY approach not saves time and money. Also provides a sense of accomplishment, in taking care of ones own nails. However it’s important to follow instructions and take precautions for a safe and hassle free experience when removing acrylic nails at home.
Preparing for Acrylic Nail Removal
Preparing to remove acrylic nails is a step to ensure a successful process. It’s crucial to gather all the tools and materials, for a hassle free removal. You’ll need items like acetone, cotton balls, aluminum foil, a nail file, a cuticle pusher or orange stick and moisturizing nail oil or cream. Creating an safe workspace is equally important. Find a lit area with a surface where you can comfortably work on your nails. Place a towel or mat underneath to protect the surface from spills or drips of acetone.
Furthermore make sure the room has ventilation to prevent inhaling fumes from the acetone. When you begin the removal process remember to take precautions to protect your nails. Trim the acrylic nails to a length. File away any excess bulk. This will make it easier to remove them without risking damage, to your nails. By prioritizing these steps you’ll be setting yourself up for an safe acrylic nail removal experience.

Step-by-Step Process for Removing Acrylic Nails
- Step 1: Gather Your Supplies
Having the correct supplies readily available is extremely important. Start by creating a checklist of items, like acetone, cotton balls, aluminum foil, a nail file, a cuticle pusher or an orange stick and a moisturizing nail oil or cream. It’s advisable to choose high quality products and tools to guarantee removal. When searching for acetone opt, for a premium option specifically formulated for removing nail polish as it aids in breaking down acrylic nails. Similarly, opt for soft and absorbent cotton balls that won’t leave fibers behind. Investing in a sturdy nail file will assist in the filing process, allowing for better control and precision.
- Step 2: Preparing Your Nails
Before diving into the acrylic nail removal process, it’s important to prepare your nails. Start by trimming the acrylic nails to a more manageable length. This will make the removal process easier and minimize the risk of accidental damage to your natural nails. Use a nail clipper or nail scissors to carefully trim the excess length. Afterward, gently file the surface of the acrylic nails. Focus on removing any excess bulk or thickness, paying attention to the edges and the area where the acrylic meets your natural nail. This step helps to create a smoother surface for the subsequent removal process.
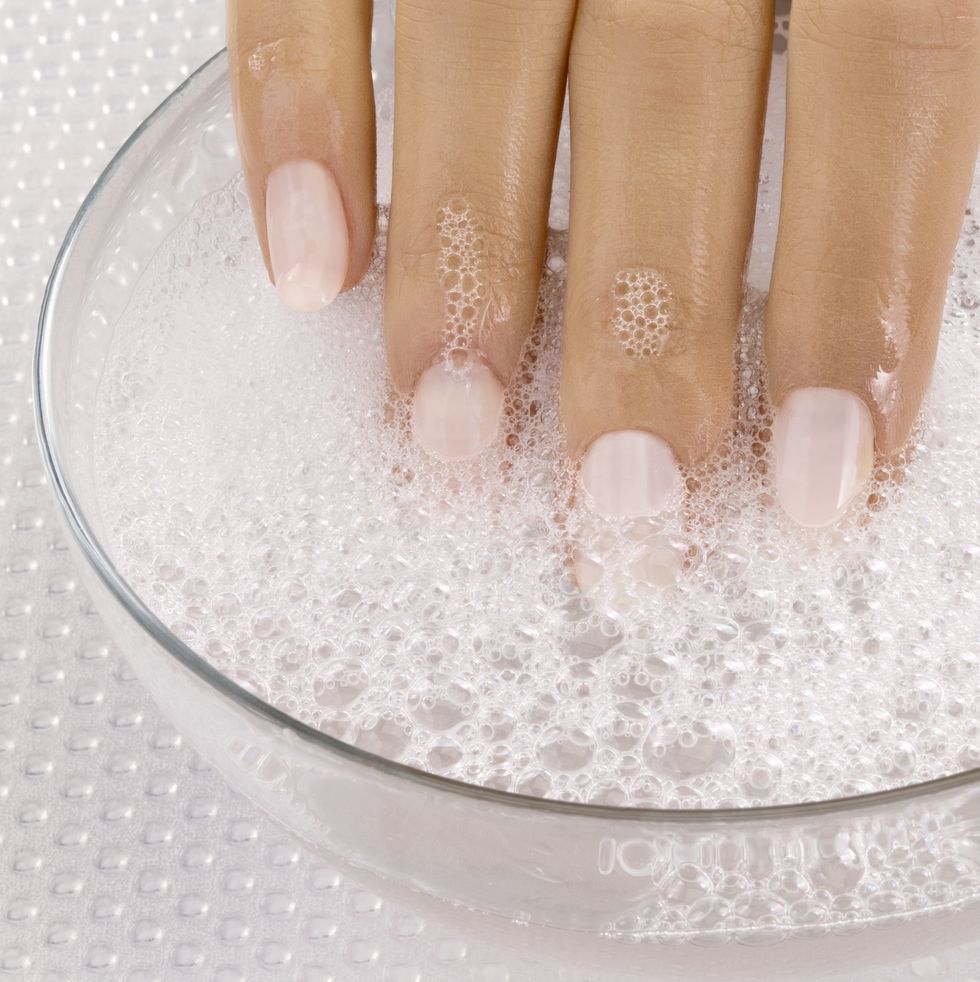
- Step 3: Soaking the Nails
Soaking the acrylic nails is a crucial step in the removal process. Begin by filling a glass bowl or container with enough acetone to fully submerge your nails. If you prefer, you can also create acetone-soaked cotton ball wraps. To do this, saturate cotton balls with acetone and place them directly on top of each nail. Alternatively you can use pre-made acetone wraps available in the market. Another option is to pour acetone into a small plastic bag and place it over your nails, securing it with a rubber band. Whichever method you choose, ensure that the acetone is in direct contact with the acrylic nails, allowing for effective soaking.
- Step 4: Waiting and Removing the Acrylic Nails
Once your nails are properly soaked, it’s important to allow sufficient time for the acrylic nails to soften. The recommended waiting time is usually around 15 to 20 minutes, but this may vary depending on the thickness of the acrylic and the brand of the product. Patience is key during this step to ensure that the acrylic becomes pliable and easier to remove. After the waiting period, use a cuticle pusher or an orange stick to gently push and lift the softened acrylic away from your natural nails. Start at the edges and work your way toward the center, applying gentle pressure. Avoid using excessive force or prying, as this can cause damage to your natural nails.
- Step 5: Caring for Your Natural Nails
Once the acrylic nails are successfully removed, it’s essential to provide proper care and nourishment to your natural nails. Begin by gently buffing the surface of your nails to smooth out any roughness or residue left behind by the acrylic. Follow up by applying a moisturizing nail oil or cream to replenish moisture and promote nail health. Look for products containing ingredients like vitamin E, jojoba oil, or almond oil, as they help restore and strengthen your natural nails. Additionally, consider using a nail hardener or a strengthening treatment to support nail recovery and prevent breakage. Remember to maintain a healthy nail care routine and keep your nails well-hydrated to support their overall health and growth.

Tips and Tricks for Smooth and Successful Results
In addition to the main steps, there are additional tips and troubleshooting advice to help address specific challenges that may arise during the acrylic nail removal process. For stubborn or hard-to-remove acrylic nails, consider soaking them for a longer duration to allow the acetone to penetrate deeper and further soften the acrylic. You can also try gently scraping the softened acrylic using a cuticle pusher or an orange stick. Moreover addressing common issues, one challenge that may occur is acetone evaporation, which can slow down the removal process. So, to overcome this, cover your fingertips with aluminum foil or use finger caps to create a sealed environment and prevent the acetone from evaporating too quickly.
Another common challenge is the presence of residual acrylic or glue after removal. In such cases, you could use a buffing block or a gentle nail file to smooth out any remaining traces. Additionally, if you experience any discomfort or irritation during the removal process, it’s important to stop immediately and consult a professional. By following these additional tips, you can ensure a successful and smooth acrylic nail removal experience.
Essential Care Tips After Acrylic Nail Removal
Once you’ve taken off your acrylic nails it’s crucial to give attention and care to your nails. The removal process can leave them fragile and prone, to damage so taking the steps for their recovery and overall well being is vital. Start by keeping your nails hydrated by applying a nourishing nail oil or cream. This will help replenish moisture and enhance their strength. Additionally trim your nails to your desired length and shape. Gently shape them using a fine grit nail file. Avoid filing. Buffing as it can weaken your nails.
It’s also important to give your nails a break from any enhancements like gel or acrylic overlays allowing them to regain their strength. When doing household chores or activities that might expose your nails to chemicals or excessive moisture safeguard them by wearing gloves. Lastly maintain a balanced diet that includes an abundance of vitamins, minerals and protein since nutrition significantly contributes to nail growth. By following these tips, for caring for your nails after removing acrylics you’ll be able to restore and maintain their health and beauty effectively.

FAQ
Yes, by following the proper techniques and using the right tools, you can safely remove acrylic nails at home without causing damage to your natural nails.
To achieve the desired results, you will need several tools and supplies, including acetone, a nail file, cotton balls, aluminum foil, a cuticle pusher, and a nail strengthener. These tools are essential for achieving the best results.
The removal process can take around 30-45 minutes, depending on the thickness of the acrylic and the technique used.
It is recommended to use fresh acetone for each session to ensure optimal effectiveness in softening the acrylic.
It is advisable to moisturize your nails and cuticles at least twice a day to keep them hydrated and prevent dryness.
It is recommended to give your nails a break and allow them to breathe for a few days before applying nail polish.